Nut-Free Mango and Passionfruit Bars
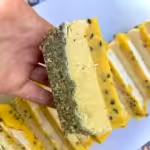
These Nut-Free Mango and Passionfruit Bars are a tropical, no-bake treat made with a crunchy seed-based crust and a creamy, silken tofu filling. Bursting with fresh mango and passionfruit flavors, these bars are completely plant-based, dairy-free, and perfect for those with nut allergies. Enjoy a refreshing slice of paradise in every bite!
- Prep Time: 25
- Total Time: 5 hours
Ingredients
Units
Scale
Ingredients:
For the Base:
- 1/2 cup sunflower seeds
- 1 cup pumpkin seeds
- 1 1/2 cups pitted dates, soaked in boiling water for 10 minutes
For the Creamy Mango Filling:
- 300g silken tofu, drained
- 150g frozen or fresh mango chunks (approx. 1 1/2 medium-size mangoes)
- 3/4 cup (170g) thick dairy-free yogurt, unsweetened
- 1/3 cup (115g) maple syrup, or to taste
- 1/3 cup (75g) raw coconut oil, melted
- 1/4 cup (60g) lemon juice, lime juice, or passionfruit pulp
- 1 teaspoon vanilla extract, optional
- Pinch of salt
For the Fruity Topping:
- 200g frozen or fresh mango chunks (approx. 2 medium-size mangoes)
- 1 1/2 tablespoons (14g) cornstarch / corn flour
- ~1/4 cup (65g) passionfruit pulp (approx. 2 medium-size passionfruit)
- 2 tablespoons (30g) lemon juice or lime juice, optional
Instructions
Step 1: Prepare the Base
- Line an 8-inch (20cm) square cake pan with parchment paper, leaving some overhang on the sides for easy removal.
- In a food processor, pulse the sunflower seeds and pumpkin seeds until they form coarse crumbs.
- Drain the soaked dates and discard the water. Add the dates to the food processor and process until the mixture is well combined and sticks together when pinched.
- Press the mixture firmly into the prepared cake pan to form an even base. Place in the fridge to set.
Step 2: Make the Creamy Mango Filling
- In a high-speed blender, combine the drained silken tofu, mango chunks, dairy-free yogurt, maple syrup, melted raw coconut oil, lemon juice, vanilla extract (if using), and a pinch of salt.
- Blend until smooth and creamy, adjusting sweetness and acidity to taste.
- Pour the filling over the chilled base, smoothing the surface with a spoon or spatula. Cover and freeze for at least 2-4 hours to firm up.
Step 3: Prepare the Fruity Topping
- Puree the mango chunks using a stand blender or hand blender until smooth.
- In a small saucepan, combine the mango puree, passionfruit pulp, and cornstarch. Cook over medium heat, whisking continuously until the mixture thickens. Remove from heat and let cool slightly.
- Spread the fruity topping over the set filling. Return to the freezer and allow it to set for an additional 30 -60 minutes.
Step 4: Serve and Store
- Once fully set, remove from the freezer and leave them to de-frost for around 30 minutes lift the bars out of the pan using the parchment paper overhang. Cut into 16 bars with a sharp knife.
- Serve immediately or store in an airtight container in the freezer.
- Remember to defrost before cutting.
Notes
Step 1: Prepare the Base
- Consistency is Key: When pulsing the sunflower and pumpkin seeds, aim for a coarse crumb texture. This will provide a nice crunch while still allowing the base to hold together.
- Sticky Enough: Ensure the date and seed mixture is sticky enough to hold together when pinched. If it’s too dry, add a few more soaked dates or a teaspoon of water to help bind it.
- Firm Press: Press the mixture firmly into the pan to create an even, compact base. This ensures a stable foundation for the creamy filling and makes it easier to cut into bars later.
Step 2: Make the Creamy Mango Filling
- Smooth Texture: Blend the filling ingredients until completely smooth and creamy. A high-speed blender is ideal for achieving the silky texture needed for a perfect filling.
- Adjust to Taste: Taste the filling before pouring it over the base. You can adjust the sweetness by adding more maple syrup or balance the acidity with extra lemon or lime juice.
- Proper Setting: Ensure the filling is well-chilled and firm before adding the fruity topping. This helps maintain the layers and prevents them from blending together.
Step 3: Prepare the Fruity Topping
- Consistent Stirring: While cooking the fruity topping, whisk continuously to avoid lumps and ensure a smooth, thick consistency.
- Cooling Time: Allow the topping to cool slightly before spreading it over the filling. This helps it set better and prevents it from melting into the creamy layer below.
Step 4: Serve and Store
- Defrost Properly: If storing in the freezer, remember to allow the bars to defrost for about 30 minutes before serving. This helps to soften the filling and make the bars easier to cut and enjoy.
- Sharp Knife: Use a sharp knife for clean cuts, and wipe the knife between cuts for the neatest presentation.
- Storage: These bars can be stored in the freezer for longer shelf life. Just remember to defrost them slightly before serving to enjoy their creamy texture.
Nutrition
- Calories: 247 kcal
- Sugar: 12g
- Sodium: 8mg
- Fat: 17g
- Carbohydrates: 21g
- Fiber: 3g
- Protein: 6g